2. Adding units
One of the most common changes done when developing custom rules (as described in the Rulesets Overview) is to add new unit types to the game. It is important to note that Freeciv21 has no prior knowledge of which unit types will exist, and much less of what they should look like. Some collaboration between the ruleset and the tileset is thus needed to provide this information. This is achieved using graphic tags in the rules; for instance, one could find the following in the definition of a new unit type, the Alien:
[unit_alien]
name          = _("?unit:Alien")
graphic       = "u.alien"
graphic_alt   = "u.explorer"
...
The graphic directive above specifies the name that the unit has from the tileset point of view,
u.alien. The second directive, graphic_alt, gives another name that can be used in case the
tileset does not support the first one. In this case, it is set to u.explorer, which the author of the
rules expects to be more widely available than u.alien — the Explorer is one of the units used
in the default rulesets. It is also not completely wrong, since in these rules the aliens are quite peaceful.
To add support for the Alien unit to our tileset, we thus need to provide the graphics for
u.alien. For this, we will use the sprites below:
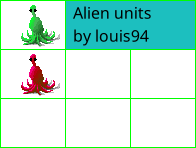
Fig. 2.1 Aliens. Aren’t they cute?
Notice that a single image contains several sprites arranged in a grid. This makes it easier to send your units to friends, but is in no way mandatory: after all, a grid with a single cell is still a grid. One can adjust the width of the green lines to your liking or remove them, or even use several grids in a single image. All it takes is adjusting the configuration accordingly.
To add these sprites to your tileset, create a new folder tutorial next to the tutorial.tilespec that
you created earlier. Download the following files and move them to the new folder:
aliens.png— this is the same image as above.aliens.spec— we will go through it shortly.
The aliens.spec file tells Freeciv21 which sprites are in the image, and where in the grid. There is only
one small change left to make the new sprites available in our tileset: we need to add the image to the
tileset. To do this, open tutorial.tilespec and find the line with files = (around the half of the
file). Insert the new spec file at the top of the list:
files =
  "tutorial/aliens.spec",
  "amplio2/terrain1.spec",
  "amplio2/maglev.spec",
  "amplio2/terrain2.spec",
  "amplio2/hills.spec",
  "amplio2/mountains.spec",
  "amplio2/ocean.spec",
  ...
That is it! Your tileset will now display the Alien units for any ruleset that supports them — or
rather, for any ruleset that uses the u.alien tag. Here is what it could look like:

Fig. 2.2 Alien invasion.
Let us now go through the newly added aliens.spec file. It can be opened with your text editor; go back to
the first page if you do not know what to use.
You will notice that the file contains four sections, each opened by a name between square brackets:
[spec], [info], [file], and [grid_main]. The first section specifies the version of
Freeciv21 supported by the tileset and will only change when moving from one version to the next. The
[info] section is there solely to give credit to the artists. The last two are more interesting, so
let’s reproduce them here:
[file]
gfx = "tutorial/aliens"
This section contains the name of the image file described by the spec: one spec can only
describe a single image file. Notice that the folder name, tutorial, is included, and that the .png
extension is not given. Freeciv21 will figure automatically that it needs to add the .png. In theory,
some other image formats could be used, but PNG is the only one fully supported on every system where
Freeciv21 runs.
[grid_main]
x_top_left = 1
y_top_left = 1
dx = 64
dy = 48
pixel_border = 1

tiles = { "row", "column", "tag"
  0,  0, "u.alien"
  1,  0, "u.alien_angry"
}
The last section describes the layout of the sprites within the image. There is a single grid, called
main, that starts one pixel from the top and one pixel from the left (x_top_left and y_top_left).
This is because of the green outline around the file: it is not counted as being part of the grid. The next
two lines specify the width (dx) and the height (dy) of the sprites in pixels. Then, we instruct
Freeciv21 to skip one pixel between each sprite (pixel_border) to jump over the green lines separating
them. With these values, Freeciv21 now has enough information to locate precisely every sprite in the grid.
The last four lines is the part that changes the most. It specifies where in the grid our two aliens are: the
green one is in the first row from the top, which has index 0, and in the first column with index 0. We give
the tag u.alien to this sprite to associate it with the corresponding unit in the ruleset. The red alien
is in the second row and first column (1, 0: remember, it counts from zero), and we call it
u.alien_angry.