Set up a Development Environment
Contributing code to the Freeciv21 project or contributing to any of the games that the Longturn community manages requires a bit of setup. This document should get you up and running with the basics. It should be noted, that you typically only have to go through this process once unless you setup a new workstation.
Base Workstation
Freeciv21 can be developed on Linux, Microsoft® Windows, and Apple® macOS. Any current version of these Operating Systems is acceptable.
It should be generally understood that Linux is the preferred development platform. For a complete set of installation steps, you can refer to Compiling Freeciv21.
For Windows, you will need to setup a MSYS2 environment first. Refer to Development Environment: Windows / MSYS2.
For macOS, you will need to setup some pre-requisites first. Refer to Development Environment: macOS.
Technically all you need is a text editor of some kind to edit the files, but most people prefer to use an integrated development environment (IDE). Freeciv21 suggests Microsoft® VS Code. It is a very capable cross-platform IDE that supports all three OS’s.
Start by downloading VS Code from: https://code.visualstudio.com/download.
GitHub
The Longturn Community uses the online source code control and revision system known as GitHub. To contribute, you will need an account on this platform. There is no cost.
With an account, you can go to the Longturn community repository page and fork a repository (such as the Freeciv21 repository) to your personal GitHub account. Go to the main page of the repository you want to fork and you will find a fork button in the upper-right corner.
In order to push code to the forked repository from your local workstation, you need to setup an SSH key pair to share with GitHub. Follow these instructions.
With SSH set up, now it is time to clone the forked repository from your personal GitHub account to a local copy on your workstation.
First make a working directory to place the files in:
$ mkdir -p $HOME/GitHub

$ cd $HOME/GitHub
You can get the appropriate path by going to your forked copy in a browser, click the code button and then select the SSH option as shown in this sample screenshot:
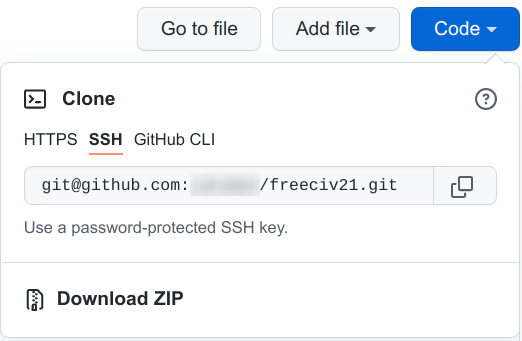
Fig. 92 GitHub Clone SSH
Once you have the proper path, here is the command to clone the repository:
~/GitHub$ git clone git@github.com:[username]/freeciv21.git
This will clone the forked repository to the ~/GitHub/freeciv21 directory on your computer.
The final repository setup item is to link the original Longturn project repository to your local area on your computer:
~/GitHub/freeciv21$ git remote add upstream https://github.com/longturn/freeciv21.git
~/GitHub/freeciv21$ git fetch upstream
~/GitHub/freeciv21$ git pull upstream master
You will also need to set a couple global configuration settings so git knows a bit more about you.
~/GitHub/freeciv21$ git config --global user.email "[email address associated with GitHub]"
~/GitHub/freeciv21$ git config --global user.name "[your first and last name]"
VS Code Setup
VS Code has a huge array of extensions to enhance the usability of the product. While you do not need to install any extensions to edit Freeciv21 code, some are useful.
C/C++ Extension Pack from Microsoft: This extension pack installs 4 extensions: C/C++, C/C++ Themes, C/C++ DevTools, and CMake Tools. These extensions make working with the code much easier and integrates our CMake build system into the IDE. You can install it by running
ext install ms-vscode.cpptools-extension-packfrom the command bar at the top.Python from Microsoft: This extension pack installs 3 extensions: Pylance, Python Debugger, and Python Environments. These extensions make working with the Python code (see
common/generate_packets.py) much easier. You can install it by runningext install ms-python.pythonfrom the command bar at the top.YAML by RedHat: This extension helps with editing the YAML files used by GitHub actions (see
.github/workflows/). You can install it by runningext install redhat.vscode-yamlfrom the command bar at the top.reStructuredText by Lextudio: This extension helps with editing the reStructuredText used by our documentation system (see
docs/). You can install it by runningext install lextudio.restructuredtextfrom the command bar at the top. We typically format word-wrap for our documentation around column 110. If you want to add a vertical bar at that point, you can add"editor.rulers": [110]to thesettings.jsonfile.GitHub Pull Requests by GitHub: This extension allows you to work with Pull Requests and Issues within the IDE. You can install it by running
ext install github.vscode-pull-request-githubfrom the command bar at the top.
Windows MSYS2 Integration
The built-in terminal in VS Code works natively on Linux and macOS. On Windows we need to do some
customization to get the terminal to interact with MSYS2’s terminal. While we are integrating the terminal
we can enhance support for .cpp code analysis.
Open the workspace settings.json from
and then clicking on the icon for the settings file (upper right corner). Add this code and adjust the path to
where you installed MSYS2 from Development Environment: Windows / MSYS2.
"terminal.integrated.profiles.windows": {
"MSYS2 CLANG64": {
  "path": "C:\\Tools\\msys64\\usr\\bin\\bash.exe",
  "args": ["--login", "-i"],
  "env": { "CHERE_INVOKING": "1" }
  }
},
"terminal.integrated.defaultProfile.windows": "MSYS2 CLANG64"
While in the settings.json, add these lines to configure clang integration:
"C_Cpp.clang_format_path": "C:\\Tools\\msys64\\clang64\\bin\\clang-format.exe",
"C_Cpp.formatting": "clangFormat",
"C_Cpp.codeAnalysis.clangTidy.enabled": true,
"C_Cpp.codeAnalysis.clangTidy.path": "C:\\Tools\\msys64\\clang64\\bin\\clang-tidy.exe",
"C_Cpp.default.compilerPath": "C:\\Tools\\msys64\\clang64\\bin\\clang++.exe",
"C_Cpp.default.intelliSenseMode": "clang-x64",
"C_Cpp.default.cppStandard": "c++17",
"C_Cpp.default.cStandard": "c99",
"C_Cpp.default.includePath": [
  "${workspaceRoot}",
  "${workspaceFolder}\\**",
  "C:\\Tools\\msys64\\clang64\\include",
  "C:\\Tools\\msys64\\clang64\\include\\**",
  "C:\\Tools\\msys64\\clang64\\lib",
  "C:\\Tools\\msys64\\clang64\\lib\\**",
  "C:\\Tools\\msys64\\clang64\\bin"
]
Qt Designer
Freeciv21 uses the Qt framework for many things, especially the game client. There are many .ui files
in the client directory. If you want to edit those in a user interface (versus editing the raw XML),
you will want to install Qt Designer.
On Linux, you can install Qt Designer from Flathub or as a Snap package. Qt only offers Designer as a native package inside the full Qt Creator IDE package, which is overkill.
On Windows and macOS you can get Designer by doing a custom install from here: https://www.qt.io/development/download-qt-installer-oss. Similar to Linux, you do not need Creator IDE, just Designer.
You can read the Qt Designer Manual for more help here: https://doc.qt.io/qtdesignstudio/index.html