Installing Freeciv21
The developers of Freeciv21 provide pre-compiled binaries and installation packages for tagged releases. They can be found on the Longturn GitHub Repository for Freeciv21 at https://github.com/longturn/freeciv21/releases. The Longturn community provides binary packages for Debian-based Linux distributions (Debian and Ubuntu), Microsoft Windows®, and Apple macOS®.
If you are an Arch Linux user, you can find Freeciv21 in the AUR at https://aur.archlinux.org/packages/freeciv21.
Note
We are in the process of moving to openSUSE Build Service (OBS) for our native Linux packages. The above mentioned GitHub releases page will eventually lose the Debian package in favor of OBS. See steps below to add our OBS repository to your system. We currently support the Stable version of Freeciv21 in OBS. If you are interested in pre-releases in the Development edition, keep using the releases page.
OBS supports both x86_64 and aarch64 binaries.
Windows
For more information on using the Windows Installer package, you can read about it at Windows Installation.
Debian and Ubuntu Linux
These systems rely on the .deb package file type.
To install the Debian / Ubuntu package, we first need to add our build service repository. Once that is complete, we can install Freeciv21.
Debian 12 and above:
$ echo `cat /etc/os-release | grep VERSION_ID | awk -F"=" '{print $2}'`
$ wget -qO- \
    https://build.opensuse.org/projects/home:longturn/signing_keys/download?kind=gpg | \
    sudo gpg --dearmor -o /etc/apt/keyrings/obs-longturn.gpg
$ sudo bash -c \
    'echo "deb [signed-by=/etc/apt/keyrings/obs-longturn.gpg] https://download.opensuse.org/repositories/home:/longturn/Debian_[##]/ ./" > \
    /etc/apt/sources.list.d/obs-longturn.list'
$ sudo apt update
$ sudo apt install freeciv21
Notes on the commands above:
The
echocommand will give you the version of Debian you are running in the familiar##format.The
wgetcommand downloads and installs the repository’s GPG key needed byapt.The
sudo bash -ccommand will write a sources.listfile. For it to work, you will need to manually change the[##]in the example above with the value of theechocommand.
Ubuntu 25.04 and above:
$ echo `cat /etc/os-release | grep VERSION_ID | awk -F"=" '{print $2}'`
$ wget -qO- \
    https://build.opensuse.org/projects/home:longturn/signing_keys/download?kind=gpg | \
    sudo gpg --dearmor -o /etc/apt/keyrings/obs-longturn.gpg
$ sudo bash -c \
    'echo "deb [signed-by=/etc/apt/keyrings/obs-longturn.gpg] https://download.opensuse.org/repositories/home:/longturn/xUbuntu_[YY.MM]/ ./" > \
    /etc/apt/sources.list.d/obs-longturn.list'
$ sudo apt update
$ sudo apt install freeciv21
Notes on the commands above:
The
echocommand will give you the version of Ubuntu you are running in the familiarYY.MMformat.The
wgetcommand downloads and installs the repository’s GPG key needed byapt.The
sudo bash -ccommand will write a sources.listfile. For it to work, you will need to manually change the[YY.MM]in the example above with the value of theechocommand.
File from our Releases Page:
If you obtained the .deb from the releases page, use the apt command with elevated privileges
like this:
$ sudo apt install ./freeciv21_*_amd64.deb
Fedora and openSUSE Tumbleweed Linux
These systems rely on the .rpm package file type.
To install the Fedora / openSUSE Tumbleweed package, we first need to add our build service repository. Once that is complete, we can install Freeciv21.
Note
The Fedora and Tumbleweed repositories contain the key needed and is installed automatically, so do not worry that the commands below do not include steps.
Red Hat Fedora 43 and above:
$ echo `cat /etc/os-release | grep VERSION_ID | awk -F"=" '{print $2}'`
$ sudo dnf config-manager addrepo \
    --from-repofile=https://download.opensuse.org/repositories/home:/longturn/Fedora_[##]/home:longturn.repo
$ sudo dnf update
$ sudo dnf install freeciv21
Notes on the commands above:
The
echocommand will give you the version of Fedora you are running in the familiar##format.The
dnfcommand will add the repository to your system. You will need to manually change the[##]in the example above with the value of theechocommand.
openSUSE Tumbleweed:
openSUSE Tumbleweed is a rolling release, which means it does not have a specific version. With that, we simply add the repository.
$ sudo zypper addrepo --refresh \
    https://download.opensuse.org/repositories/home:/longturn/openSUSE_Tumbleweed/ Longturn
$ sudo zypper install freeciv21
Generic Linux
Freeciv21 is also available as a snap or flatpak containerized application. Different distributions support one or the other by default.
Snap
Debian Linux variants (those that rely on apt for package management):
$ sudo apt install snapd
$ sudo systemctl enable snapd
$ sudo snap install freeciv21
Fedora/Red Hat Linux variants (those that rely on dnf for package management):
$ sudo dnf install snapd
$ sudo systemctl enable snapd
$ sudo snap install freeciv21
Flatpak
Debian Linux variants (those that rely on apt for package management):
$ sudo apt install flatpak
$ sudo flatpak remote-add --if-not-exists flathub https://flathub.org/repo/flathub.flatpakrepo
$ sudo flatpak install net.longturn.freeciv21
Fedora/Red Hat variants (those that rely on dnf for package management):
$ sudo dnf install flatpak
$ sudo flatpak remote-add --if-not-exists flathub https://flathub.org/repo/flathub.flatpakrepo
$ sudo flatpak install net.longturn.freeciv21
macOS
To install the macOS .dmg package, you start by double-clicking the file to mount it in Finder. Drag the
game to the Applications folder. When finished, unmount the package.
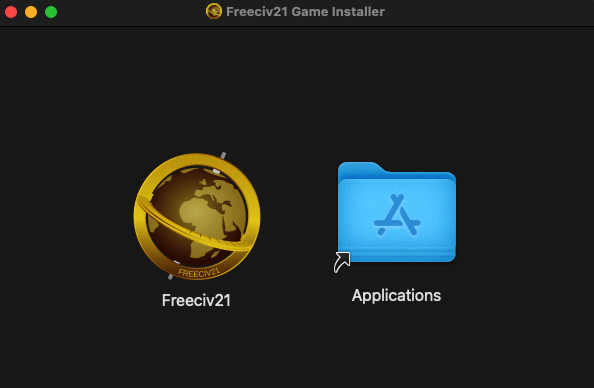
Fig. 2 Freeciv21 macOS Install
Note
In newer versions of macOS, you may get an error message when trying to mount the package: “Freeciv21.app is damaged and can’t be opened.” You will need to adjust the security settings on your computer. Here are some website links to help:
Docker
A Note About Native Language Support
Freeciv21 is packaged with Native Language Support (NLS), also known as Internationalization (i18n). By default, Freeciv21 will use the primary language that the client operating system is set to use. However, you may wish to play the game with a different language.
All the code and strings used in the game are based on US English (en_US) and encoded as UTF8
(en_US.UTF8). If you wish to play the game in a different language, you can do so by setting an
environment variable to the language code of your choice.
At a minimum, all you need is the two letter code of the language you wish to play with. Here is a list of them: https://en.wikipedia.org/wiki/List_of_ISO_639_language_codes
Note
We do not support every single language code in the list above, but we do have some translations for many of them.
On a Linux or macOS based system, open a terminal and set the LANG variable to the language code. In the example
we pick German (Deutsch).
$ LANG=de_DE.UTF8 path/to/freeciv21-client
That setting will stay in effect as long as the terminal window is open. Freeciv21 will use the environment context into account.
If you have installed the snap package, you can run the game with the language of your choice as well.
Following the example above, we pick German and then open the game via snap.
$ LANG=de_DE.UTF8 snap run freeciv21.freeciv21-client
Note
You can also add export LANG=de_DE.UTF8 to your user’s .bashrc or .bash_profile.
On macOS use .zshrc. The variable will then be set every time you logon to your computer. However,
this could also sets the language for pretty much every application.
The LANG variable also works on Windows based systems. Open a command prompt, powershell prompt, or
terminal.
PS C:\Users\Username> setx LANG de_DE.UTF8
Then open Freeciv21 from the start menu like normal.
Note
As with the note related to Linux based systems. The setx command sets a user level environment variable
to the language selected. Any applications that use the LANG variable will also be impacted. This is
especially true when working in the MSYS2 environment. You can set the variable to another language following
the same step above. Simply set the variable to a different locale code.