Menu Bar
The Menu Bar consists of the following items:
Game Menu
The Game menu is used to conduct global level options on the client or the game being played. It has the following options:
- Save Game
Saves the game as it is right now to the default save location.
- Save Game As …
Saves the game as it is right now to a location of your choosing.
- Save Map to Image
Save a
.pngimage file of the map to the user’s pictures directory.- Interface Options
Opens the Interface Options dialog box as described in the Options section above.
- Game Options
Opens the Game Options dialog as described in the More Game Options section above.
- Message Options
Opens the Message Options dialog as shown in Fig. 28 below. The screenshot only shows a few rows of available options, many more will be found in the client. Any item with a check mark in the Out column will be shown in the Server Chat/Command Line widget. Any item with a check mark in the Mes column will be shown in the Messages widget (see Messages). Lastly, any item with a check mark in the Pop column will be shown in a pop up message box window.
You can go to the Game Message Options page for a complete list of all available options.

Fig. 28 Message Options Dialog
- Shortcut Options
Opens the Shortcuts dialog as shown in Fig. 29 below. The dialog is used to set the preferred keyboard shortcuts to be used in the game. The screenshot only shows a few rows of available options, many more will be found in the client. To override the default, click your mouse cursor on the box on the right and then type the shortcut you want to set the setting to. For example: You want to change the Scroll Map option to the PgUp key, you would click in the box and then press the PgUp key on your keyboard. To reset to defaults, you can click on the Reset button. Click Save and then Close when finished.
You can go to the Game Shortcut Options page for a complete list of all available options.

Fig. 29 Shortcut Options Dialog
- Load Another Tileset
Opens the Available Tilesets dialog as shown in Fig. 30 below. You can select any tileset installed by clicking on the name. You may get an error message if the tileset is not compatible with the current ruleset (for example: if it lacks a unit).

Fig. 30 Available Tilesets Dialog
- Add Modpacks
Launches the modpack installer. This utility allows the Longturn community to create third-party content and offer it for enhanced gameplay. For more information refer to Using the Modpack Installer Utility.
- Tileset Options
For tilesets supporting it, opens a dialog that lets you change the appearance of the map.

Fig. 31 Tileset Options Dialog
- Tileset Debugger
Opens the Tileset Debugger dialog. This option is documented in Tileset Debugger
- Save Options Now
Save the settings set in Options immediately.
- Save Options on Exit
Saves the settings set in Options when the client is exited.
- Leave Game
Allows you to leave the game and return to the start screen.
- Quit
Quits the client after a confirmation dialog box.
View Menu
The View enables a user to manipulate what is shown on the Map View as well as varying degrees of zooming in and out.
The View menu has the following options:
- Center View
With a unit selected, this menu option will place the unit in the center of the screen.
- Fullscreen
Sets Freeciv21 to use the whole screen, removing the title bar and operating system Task bar.
- Minimap
Shows or hides the Minimap in the lower right corner.
- Show New Turn Information
Enables or Disables populating new turn information in a widget on the Map View.
- Show Detailed Combat Information
Enables or Disables populating the Battle Log widget. When enabled you will see a widget appear on the screen (typically in the upper left corner) after combat occurs in your nation’s vision. Your nation’s vision is all map tiles that are visible to your nation, either natively or via shared vision treaty with an ally or team mate. The figure below gives an example of 3 combat events.
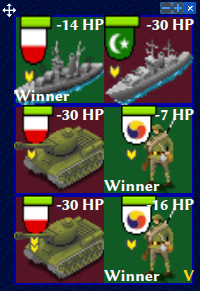
Fig. 32 Battle Log
You can move the widget by click+dragging with your mouse on the plus symbol in the upper left corner. You can also scale the widget larger or smaller with the plus and minus icon buttons near the upper right corner. You can close the widget by clicking on the
xsymbol in the upper right corner. Lastly, if you click on the winning unit icon in a row, the client will move the map to where the combat occurred.If you do not do anything with the Battle Log widget after combat occurs, it will fade from the map automatically after 20 seconds.
- Lock Interface
Locks the user interface, preventing the move of objects around such as the server log/chat widget.
- Zoom In
Each selection of this menu option (or corresponding keyboard shortcut or user interface button next to the Minimap) will zoom in on the Map View one level.
- Zoom Default
Resets the zoom level to the default position at Zoom Level 0.
- Zoom Out
Each selection of this menu option (or corresponding keyboard shortcut or user interface button next to the Minimap) will zoom out on the Map View one level.
- Scale Fonts
Enables fonts to scale along with the zoom level.
- City Bar Style
This menu has a sub-menu of three options: Simple, Traditional, and Polished as shown in Fig. 33, Fig. 34, and, Fig. 35, respectively.
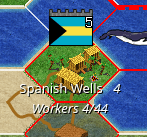
Fig. 33 City Bar Style - Simple
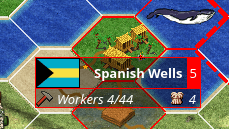
Fig. 34 City Bar Style - Traditional
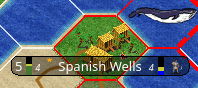
Fig. 35 City Bar Style - Polished
- City Outlines
Enables or Disables the display on the Map View of the city’s vision radius or outline.
- City Output
Enables or Disables the display on the Map View the city’s food, production, and trade as shown in the City Dialog.
- Map Grid
Enables or Disables the display on the Map View the tile grid. This can be useful to help differentiate individual tiles from others.
- National Borders
Enables or Disables the display on the Map View the national borders of your neighbors. Each nation is given a color at game start (as seen on the Nations and Diplomacy View).
- Native Tiles
Enables or Disables the display on the Map View tiles that are native to the unit selected. Non-native tiles are marked with a red hash. Non-Native means that the unit cannot move there.
- City Names
Enables or Disables the display on the Map View the names of cities in the city bar.
- City Growth
Enables or Disables the display on the Map View the growth of cities in the city bar.
- City Production Levels
Enables or Disables the display on the Map View the production of cities in the city bar.
- City Buy Cost
Enables or Disables the display on the Map View the cost to buy the currently constructed item in the city bar.
- City Traderoutes
Enables or Disables the display on the Map View trade routes between cities.
Select Menu
The Select is used to select units on the game map in varying degrees. It has the following options:
- Single Unit (Unselect Others)
Assuming you have selected multiple units (such as the next menu for All on Tile) and you want to quickly undo that. This menu supports that function.
- All on Tile
Quickly select all of the units on the same tile. This assumes that multiple units of different type are stacked on the same tile.
- Same Type on Tile
Quickly select all of the units of the same type on the tile. This assumes that multiple units of different types are stacked on the same tile.
- Same Type on Continent
Works the exact same way as the menu option above (Same Type on Tile) but expands the selection to the same island or continent.
- Same Type Everywhere
Even larger window of unit selection to pick all of the same type, but in all locations across the Map View. This is useful to help you find units placed in allied cities or to conduct a mass airlift.
- Wait
If you are not ready to move the currently selected unit, you can tell it to wait with this menu option. The rotation of unit selection will bypass this unit and will come back until you either move the unit or tell it you are done.
- Done
If you have moved the unit, but still have move points left or are simply done working with the unit for you can tell the client you are finished (done) with it with this menu item.
- Advanced Unit Selection
Opens the Advanced Unit Selection dialog box as shown in Fig. 36 below. This dialog box gives you options to select a group of units using a more nuanced grouping method than the other Select menu options.

Fig. 36 Advanced Unit Selection Dialog
Civilization Menu
The Civilization menu is used to gain access to many functions of your empire. You can load up pages for units, cities, nations, etc; change the form of government and see how you are doing compared to your opponents with the demographics report. It has the following options:
- National Budget…
Selecting this menu item will bring up a dialog box allowing you to set the rate in percentage points for gold (taxes), science (bulbs), and luxury (goods). This is the same as clicking on the National Budget View button on the Top Function Bar. Fig. 37 dialog below, shows a sample screenshot. In this example, the player’s nation is in Democracy, has set gold to 30%, science to 40%, and luxury to 30%.

Fig. 37 National Budget Dialog
Note
In Freeciv21 the National Budget is simplified into three segments: gold collection, scientific output, and luxury goods.
- Government
Depending on your technological progress through the game, you may be able to select a different form of government. The change is achieved from this menu item. This is the same as clicking on the National Status View option on the Top Function Bar.
- Map View
Clicking this menu item will show you the main game map. This is the same as clicking on the Map View option on the Top Function Bar.
- Units View
Clicking this menu item will show you the units report widget. This is the same as clicking on the Units View option on the Top Function Bar.
- Nations View
Clicking this menu item will show you the nations and diplomacy view. This is the same as clicking on the Nations and Diplomacy View option on the Top Function Bar.
- Cities View
Clicking this menu item will show you the cities view. This is the same as clicking on the Cities View option on the Top Function Bar.
- Economy View
Clicking this menu item will show you the economics view. This is the same as clicking on the Economics View option on the Top Function Bar.
- Research View
Clicking this menu item will show you the research tree view. This is the same as clicking on the Research View option on the Top Function Bar.
- Wonders of the World Report
Clicking this menu item will show you a traveler’s report widget on the Map View. The widget will give information on any cities that have constructed any of the great wonders.

Fig. 38 Wonders of the World
- Top Five Cities Report
Clicking this menu item will show you a traveler’s report widget on the Map View. The widget will give information on the top five largest cities.

Fig. 39 Top Five Cities
- Demographics Report
Clicking this menu item will show you a demographics report widget on the Map View. The widget will give information about how your nation stacks up against your opponents. If you have an embassy with your opponents in the game, the demographics report will tell you who is #1, if you are not #1.

Fig. 40 Demographics
- Spaceship View
Clicking this menu item will show you the spaceship view. The space race is a ruleset defined option and is not enabled in all rulesets. Your nation must also be very technologically advanced to build the components needs for a spaceship. See in game help for more details.
The client will automatically place the components for you as you construct them.
- Achievements Report
Clicking this menu item will show you an achievements report widget on the main map. Achievements are a ruleset defined option and not enabled by default in many rulesets.
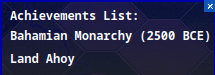
Fig. 41 Achievements